

Air Layering
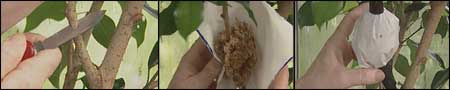
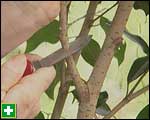
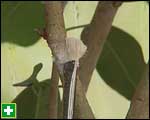
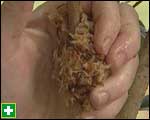
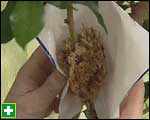
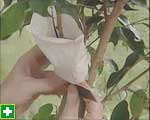
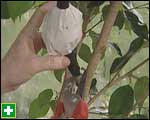
Spring has long sprung, and we are reminded that it is the time for propagation. In ancient China, gardeners used a method of propagating plants called layering. That's where you get the branch, pull it down while still attached, and secure it somehow to the soil. We want to do a cutting from this Ficus benjamina, but the branches are too high off the ground. So what we're going to show you is air layering. It's a simple process and involves making a wound in the plant. First, trim away some of the growth so you can see what you're doing. The areas where the branches and leaves come through — called nodes — are where the roots will come from when we attach the sphagnum moss. Then make your cut. This can be a little tricky, so make sure you use a sharp knife. Cut about 5 mm in. You're actually after a tongue of wood immediately below the node — just slice upwards to it. The roots will emerge from the gap where it is cut. Meanwhile, soak some sphagnum moss in water for about 30 minutes. It needs to absorb plenty of water because once you've sealed it in its plastic bag, it won't get any water for about three months. Take a piece of plastic and wrap that around the base of the cut branch and sphagnum. The whole point of this is so that water cannot get out or in. It has to be properly sealed, so make sure you have a reasonable piece of tape. Wrap the tape around the plastic to secure it tightly. With the plastic, although the white is unattractive, at least it has the properties the plant needs. If it were black and the plant was in sunlight, it would overheat inside. Although the rooting hormone has fungicide, black plastic isn't recommended. Nor is clear plastic because algae may build up, and you then find yourself opening the bag in great excitement two months later to find it's rotted. Check the way the plant is progressing after about eight weeks or so. You need to be patient because it takes at least two to three months to root. Some plants like rhododendron and camellia might take the whole growing season. There's all sorts of plants you can do that with, including the New Zealand or Australian tea-tree. Try experimenting with different plants.
|
Home | Journal
| Newsletter | Conferences
Awards | Join
RNZIH | RNZIH Directory | Links
© 20002026 Royal New Zealand Institute of Horticulture
Last updated: March 1, 2021