

Build a worm farmRuud Kleinpaste visits
a commercial worm farm to gather tips on how to set up and maintain
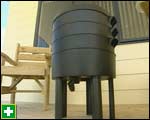
your own 'farm'. Power Organics is the largest worm farm in the southern hemisphere. 60 tonnes of earthworms operate here — that's 240 million creatures. Each year they chomp through 10,000 tonnes of organic green waste, and in the process they make the most wonderful fertiliser. Worm cast is biologically active and free of artificial substances. Cobi Thompson of Power Organics thinks it's the way of the future — a clean, green way of improving soil and caring for the environment. How, then, do you keep 60 tonnes of earthworms happy? "They like a mixture of greenfeed, grasses, paper pulp, and a good mixture of moisture," says Cobi.
Small-scale worm farms are available at plant shops and some building suppliers. They follow similar principles to those used by Power Organics: you put the organic waste on top, add worms and soil to the second level, and the worm cast will drop to be collected on the third.
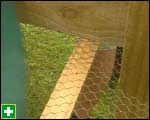
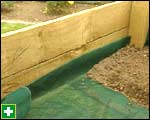
Tanalised timber, about a foot deep, gives you plenty of space. Make sure you build it off the ground, though, so you don't get dogs and cats in it, and you don't have to bend over when you're tending to your charges.
Then put some weed mat over the netting, and place some topsoil over that. (Only cover one half of the bin with the soil). Worms don't actually live in their food — the soil gives the worms a substrate in which to live.
"For a bin this size I would start with a kilo. They'll soon multiply themselves up from here." The number of worms you'll end up with depends on the volume of food they receive, says Cobi. "They will keep breeding as long as they feel they have sufficient food."
"Yes, our bills," laughs Cobi. "We just tear them up into pieces." Water is added to the bucket to give everything a good soak. After a good stir, it's ready to go into the bin. Cobi spreads it across the bed of soil, then covers that with a piece of carpet. Newspaper can be used instead, but Cobi prefers the fibrous stuff. "I always use underfelt or carpet. Eventually they'll eat both of those." When it next comes to adding food, place a little bit more soil to the side of the existing soil. Place some food on top of the new soil and a little more (a smaller amount) to the existing soil. By doing this, you will be slowly building the bed out (and up) until the entire bin is covered. When you want to harvest the vermicast, start putting food only on one half of the bin. After a couple of weeks, all of the worms will have migrated to the side where the food is. You can then remove the 'bare' vermicast, then start all over again.
|

Home | Journal
| Newsletter | Conferences
Awards | Join
RNZIH | RNZIH Directory | Links
© 20002026 Royal New Zealand Institute of Horticulture
Last updated: March 1, 2021